Removable Wallpaper
We are proud to have the most premium Removable Wallpaper on the market! This amazing product is a peel and stick, made from fine matte fabric (polyester) and easy to install yourself. Our processing time is 3-5 business days before shipping it off for you. If you require it quicker, just let us know! Just position it on your wall and slowly remove the backing as you smooth it down the wall with your hands. It’s easier than you think!
Our processing time is 3-5 business days before shipping it off for you. If you require it quicker, just let us know!
Just position it on your wall and slowly remove the backing as you smooth it down the wall with your hands. It’s easier than you think!
Can you make or acquire custom designs?
Yes – we do custom designs! If you have an idea mind, simply send us an email
What about paste up wallpaper?
You can order any of our designs in Traditional Paste Up Wallpaper, and it’s 35% cheaper than our removable. Some people say it’s easier to install, but all depends what you are used to or have used before.
Each order is custom made
Our wallpaper is bespoke so each order is made to your specific wall dimensions.
Panels will be evenly spaced across your wall, so you won’t need to awkwardly trim panels at the end or have an uneven panel on the wall.
It will arrive safely packed in a big tube/carton, with numbered panels in correct order, with easy-to-follow step-by-step instructions.
If you would like to see some of our clips on installation, feel free to check our Instagram highlights and reels.
Do you recommend particular installers?
Yes! We can recommend installers if you are not comfortable to put it up yourself – just send us an email to studio@bohoartstyling.com
It’s also a good idea to Google search for local “painters and decorators” and ask them if they installer self adhesive wallpaper.
How many panels do I need?
Measure the total width and height of your wall in (mm). Don’t forget to include windows and any space above doors in your measurements. We don’t make small wallpaper pieces to fit around obstacles, so you will need to trim around your windows etc during installation with a sharp stanley knife. It is not as difficult as you might think!
Need more or less height?
If you require additional wall height over our standard 250 cm height click here to add it to your cart, or with shorter heights (i.e. if you are doing a half wall up to 125cm high) please use the half wall option here.
Click on the wallpaper design you like, and select the number of panels you require. If your walls are a bit uneven or you are wrapping around a room, it’s a good idea to add another approx. 5-10cms on to your total width. Better to have a little extra than not enough.
Wall Preparation
For teflon-based, low or no VOC paints and paints that are mould/stain resistant or have been recently painted, we recommend using a good quality primer such as Viponds Self Adhesive Prep Coat before you install your wallpaper. Priming before you wallpaper will ensure the adhesive will not become compromised by any repellents in the paint, chemicals/gasses and ensure correct adhesion and safe removal.
Viponds Self Adhesive Prep Coat
The great thing about Viponds, is that the wait time is only 24+ hours before you can install your wallpaper. If you use Taubmans and British Paints prep coats from Bunnings, the wait time is 4-6 weeks before installation. Primers will need to go on top of your wall paint before installing wallpaper to act as a barrier between the paint and the wallpaper. Lack of correct wall preparation increases the risk of your wallpaper falling off.
Installation instructions come with your wallpaper, and will go into more detail about how to install yourself!
Trimming around switches
Turn your electricity off. Remove the face plate off the switch. Install the wallpaper right down to the switch as close you can. Carefully Stanley knife around the edge of the switch, being careful not to trim too much. As soon as the edge is trimmed, flatten the wallpaper around it and replace the face plate. Another method is to scissor a cut in the wallpaper over the centre of the switch. Cut the wallpaper from the centre, out to the edge of the switch, being careful not to cut too far.
OR – another method…
Stick the wallpaper down from the left/top of the switch (as you are installing left to right top to bottom) and snip/cut a little hole in the middle of where the switch is. Work from the inside out to the edge of the switch with scissors or a stanley knife. Scissors for the middle (you don’t want to scratch your light switch) and stanley knife for the more intricate edges. Just trim little by little and avoid cutting too much. Here is an example of this method:
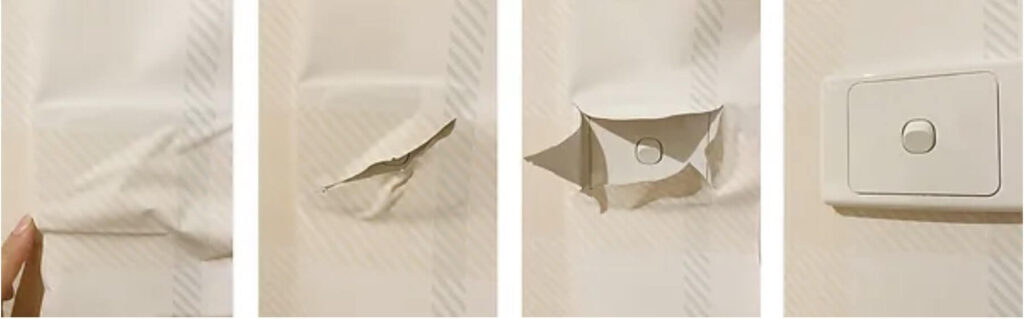
So with these options, you can choose to trim the wallpaper from edge of the switch and around, or from the middle of the switch and out – whatever you think might be easier for you.
Shipping outside of Australia
For shipping outside of Australia, please visit our Custom Orders and International Shipping page or contact us and we can get a shipping quote for you.